
Menu
Home
Back
My Angel eye Headlight: how to guide
my
xbox mod site
DOWNLOADS
Theories on how Mario is a Communist
my
simpsons quizes
My movie downloads
The car page feat: Night Rider
money that i've blown on my taurus
my $7 shirt
MY pheasant website which i did for a class |
DIY Angel Eye
Angel Eye? What is that? 'Angel Eye'
is a cool headlight feature found on the new (2001+) BMW 5 Series.
The projector headlamp unit on the BMW 5 series has a pair of
circular-shape rings that when light up, they produce a pair of
halos. BMW calls them 'Angel Eyes'. They are also refered to as
'Demon Eyes'. They look very nice on the BMW 5 Series. They don't
serve any purpose other than for the nice and aggressive look, and
to distinguish the newer BMW 5 Series from other BMW models at
night.
This page shows how I created a pair of 'Eagle Eyes'
for my high-beam projector headlight. I call them 'Eagle Eyes'
because they look like the eyes of an eagle. Only three quarter of
the ring are lid up, like a crescent moon. They are not exactly like
full circle of the BMW's Angel Eyes, but close enough.
Creating a Custom Angel Eye
|
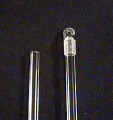
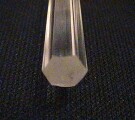
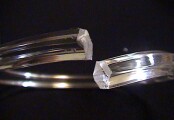
Instead of a round glass rod used by BMW, I used a clear acrlyic/plastic
rod. I bought it for $1.97 at a home improvement store, such as Home Depot
or Bed Bath & Beyond. Not all Home Depot carry them, so you may have to shop
around. The rod is actually made for your window blind to open/close the
blind when you turn it left/right. It is about 2.5 feets long, and you can
create 2 to 3 angel eyes depending on how big your ring is. The rod has a
hex-shape structure, not a round shape like the BMW, but it will do just
fine. |
|
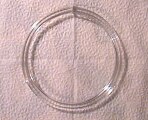
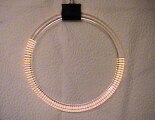
The first thing I did was to create a circular ring out of it. I measured
the diameter of my high-beam projector housing, which comes out to be 4" (or
2" radius). Using the circular formula (C=2'pi'r, where pi=3.14), you'll
have to cut your rod about 12.5 inches long. I suggest cutting it 15" long,
and use the extra inches as handles to help in the molding process.
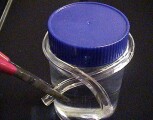
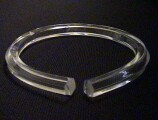
Next, I find an aluminum can or jar that has about the same diameter as the
ring (I used a peanut jar). After heating the rod in a small toaster oven
for about 5-7 minutes at 300�F, I held the two ends of the now flexible rod
with a pair of pliers, and wrapped the rod around the glass jar with one end
crossing over the other end. The flexible rod will harden within a minute.
So, you may have to repeat this step 1 more time to mold it into a perfect
circular ring. Once done, you can use a Dremel tool to cut the extra handles
that were used during the molding process. You will end up with one end
above the other, as shown. Don't worry, just simply put it back in the oven
one last time and allow the ends to soften and flatten.
|


|
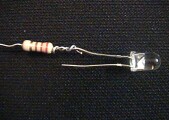
To test out how it lights up, I put a small halogen bulb between the open
ends of the ring. "Wait a minute here, young man. It doesn't look like
'Angel Eye'. No halo ring effect." |
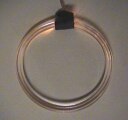 |
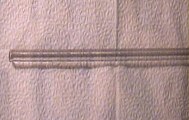
Yes, I know. That is because light
goes in straight line, and it takes the shape of whatever object it
goes through. In the case above, it goes through one end of the rod
and out the other end, like a fiber optic cable. In order to make it
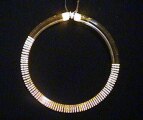
lights up like the true 'Angel Eye', I had to refract the light as
it goes through the rod by making multiple cuts (scratches) along
the rod, using a Dremel tool. Each cut/scratch allows the light to
'escape' the ring. Each cut is about 2~3mm apart. Note that the more
cuts you make, the dimmer the light becomes, because most of it has
'escaped' before it reach the other end of the rod.
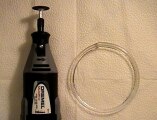
It will
take about a minute to do this with a Dremel tool. If you don't have
a Dremel tool, you can use a small saw or a butter knife. It will
take you longer though. A Dremel Tool set would cost about $29 to
$59, depending on certain features such as cordless, variable speed,
attachments, and accessories. It has many uses, such as cutting,
sanding, carving, buffing, drilling, etc. Good tool to have for
hobbies.
Hint: To get the cuts look perfect, you can do the
cuts ahead of time before making a circular ring out of it.
 |
 |
 |
 |
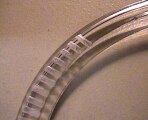
Cuts along the back-side
of the rod. |
On the front side, the cuts
are multipled by the hex-shape. |
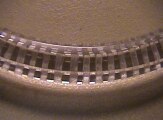
With a Dremal tool, you can
create the cuts in 3-5 minutes. |
Full view of angel eye rod. |
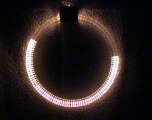
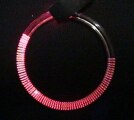
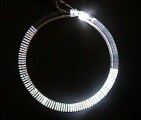
Here are some shots of my 'Eagle Eyes'
after creating the cuts (scratch lines) along the ring.
 |
 |
 |
Angel eye with
some foreground light. |
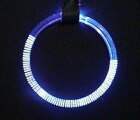
The halo ring effect
is more noticeable at night. |
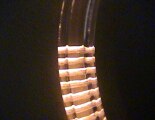
Closeup shot of light being refracted
through the cuts along the rod. |
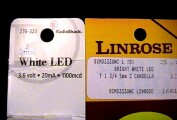
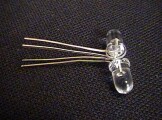
Instead of using halogen light, I used LED light for my
angel eye. Halogen bulb is not only very hot and inefficient, it
doesn't last very long. I don't want to open up my headlight unit to
replace the bulb every time it burns out. Further, halogen bulb may
melt your ring. LED is a great alternative. It is very very
efficient, lasts very very long, and produce very little heat. They
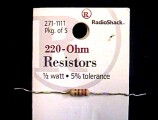
cost from around $2.99 to $3.99 each at your local Radio Shack
store. Note that LED bulbs are not like any other halogen bulbs
where you can just connect positive and negative wires to them to
light them up. You must use a resistor on the positive terminal, the
longer of the 2 terminals. The purpose of the resistor is to
limit/resist high current going through the LED bulbs. LED bulbs
require only a small amount of current to light up. Hence the
efficiency. Resistors should cost from $0.99 to $1.99 for a set of
5.
Resistance is measured in ohms. The get the correct
resistance, use this modified version of Ohm's Law:
In my case, I have a 12V battery and a
3.6V LED with 20mA (or .02A). So, I use a resistor of 420 ohms [(12V
- 3.6V)/.02A]
You can use a lower ohms resistor, eg 220 ohms, to
light up your LED. In fact, it will make your LED brighter because a
low resistance allows more current to go through the bulb. Although
it can be done, your bulb may burn out prematurely.
 |
 |
 |
 |
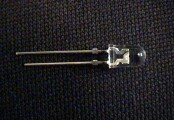
A white LED bulb.
Positive is the longer terminal. |
A 1100 vs a 2000 mcd LED bulbs.
mcd (milli-Candela) measures brightness. |
A 220 ohms resistor. Resistors
restrict current going through a bulb. |
Resistor connected to positive lead,
which is the longer one. |
LED light comes in many different color, red, blue, orange,
yellow, green, and white. Red is really nice and will definitely
make your car stand out, but I used white LED to be compliance with
state laws. They even come in multi-blinking colors too, and I think
cops love them. They'll be happy to turn on their version of
multi-blinking color light. :)
 |
 |
 |
 |
|
Angel Eye with yellow LED. |
Angel Eye with blue LED. |
Angel Eye with red LED. |
Angel Eye with white LED. |
After testing them out, it was time
for me to put them into my HID projector headlight unit. First, I
had to open apart my headlight unit. This is done by heating it in a
cooking oven for about 10-15 minutes at 350�F or until the glue
loosen. It may take a longer or shorter time to soften the glue on
different headlamp units. Remove any attachments, like your bulb or
wire harness, that may not be able to withstand the heat. Be very
careful when separating your projector unit because the glue will
stick to anything it can get a hold of. Think of hot melted cheese
on a slice of pizza when you pull it apart.
Here's my
recommendation: As you pull apart the front cover from the headlight
unit, cut/trim the cheesy web-like glue. Remember, pull a little and
then trim a little, and repeat this step. Take your time and do it
slowly. You have about 20~30 minutes before the glue harden. Plenty
of time. As you trim, the glue will retract, and you can reuse the
glue later when re-attaching the headlight back together.
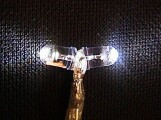
To
secure the LED bulbs into my Eagle Eye ring, I drilled a hole in
both ends of the ring, about 4mm deep. I used two white LED bulbs
and paired them together. With a resistor and wires soldered to the
LED bulbs, I inserted the bulbs inside the holes of the ring. I
wrapped black electric tape around it to hide to LED bulbs. You can
paint them black if you like or use heat shrink tube. I ran the
wires through the water drainage opening on the headlight unit. I
then glued the rings to the outer frame of my high-beam housing,
using clear silicon adhesive. I applied only a very small amount of
glue to the un-scratch/un-cut part of the ring.
 |
 |
 |
|
Two LED bulbs parallely paired. |
LED bulbs soldered & then glued together. |
Resistor can be connected at end of wires. |
Next, it was time for me to re-attach
the front cover back onto the headlight unit, using the same glue.
Just reheat them in the oven until the glue melt again and re-attach
the two parts together. Remember to apply pressure to get an
air-tight hold. I had to sit on it to get this done. Finally, I put
the headlight unit back onto my car, and connected the wires to my
parking lights, using parallel connection. You can connect it to
anything, an external light swith, high-beam, running light, etc.
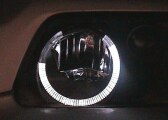
 |
 |
 |
 |
|
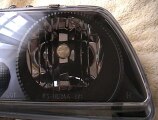
High-beam housing without Angel Eye. |
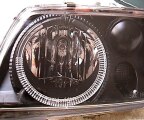
High-beam housing with Angel Eye. |
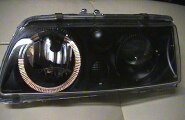
Angel Eye at work with halogen bulb. |
Closeup shot. |
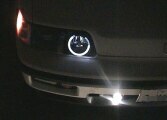
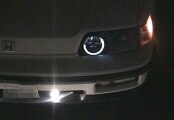
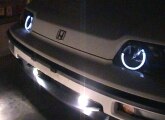
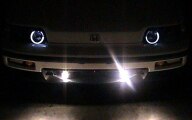
Miscellaneous Pictures of My Eagle
Eyes At Work
 |
 |
 |
 |
 |
|
Angel Eye with white LED. |
Close-up shot on passenger-side. |
Close-up shot on driver-side. |
With 8000k HID lowbeam. |
Close-up shot of Angel Eye. |
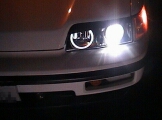
 |
 |
 |
 |
 |
|
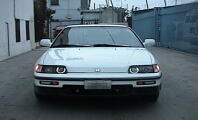
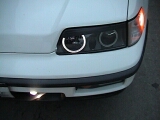
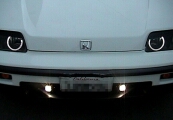
Angel Eye from the side. |
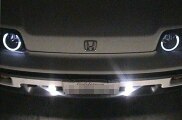
Full view of my CRX. Nice! |
Angel Eye on an early morning. |
Close-up shot on driver-side. |
On a gloomy day, halo ring still visible. |
Well, I hope this page gives you an
idea of how to create a home-made 'Angel Eye'. It is not very
professional/quality work, but it is a poor man's way of doing
things (I mean a poor kid). If you plan to do this on your car, make
sure you have the right tools and that you have some crafting
skills. I don't want you to ruin your expensive BMW or your beloved
car. The general do-it-yourself procedures I wrote above show how I
did it on my CRX. They may be different on your car. May require
extra work & time for more sophisticated car, along with some
imagination and creativity too. I also suggest that you practice
assembling your angel eyes and testing them out first before you
start taking out your headlight and opening it apart. The procedure
for dis-assembling your headlamp unit from your car may be the
toughest part, and not all headlamps can be taken apart. Now that
you are warned, go have fun, good luck, and enjoy!
For those
who don't like getting their hands dirty or don't have any free time
and have money to spend, you can buy the real quality BMW Angel Eye
on the web. Even then, you may still have to open up your projector
housing, fit the Angel Eye inside, and connect the wires. I don't
think it's 100% plug-n-play. These Angel Eye kits, aka 'Demon Eyes'
kits, are made exclusively for BMW headlights. However, there are
also aftermarket projector headlights with built-in LED Angel Eye
rings, but not one made for a CRX :( I like them so much that I had
to do it myself, and I found the process to be fun too.
Imagine a BMW Z3, an Audi TT, a Honda S2000, a Supra, a Celica, a
Miata, a 300Z, a Beetle, and not to mention a 2nd or 3rd generation
Eclipse coming down the street with Angel Eyes and creeping torward
you from behind. Make me scared and nervous just thinking of it. :)
Back
|
)
)
)
)
)
)
)
)
)
)
)
)
)
)
)
)
)
)
)
)
)
)
)
)
)
)
)
)
)
)
)
)
)
)
)
)
)
)
)
)
)
)